
If you’re in the mood for a dessert that’s both elegant and easy to make, the strawberry cheesecake trifle is a perfect choice. It’s a delightful combination of creamy cheesecake, fresh strawberries, and tender ladyfingers, all layered together in a glass trifle dish. This dessert not only looks impressive, but it also tastes like a dream—sweet, fruity, and smooth.
The Ingredients You’ll Need
To make a strawberry cheesecake trifle, you need a few simple ingredients that, when combined, create a stunning dessert. Here’s what you’ll need:
- 2 cups fresh strawberries, sliced: These are the star of the show. Make sure they’re ripe and sweet for the best flavor.
- 1 cup strawberry jam: This adds a concentrated burst of strawberry flavor between the layers.
- 2 cups heavy cream: You’ll whip this to create a light and airy texture in the trifle.
- 1 teaspoon vanilla extract: This adds a hint of warmth to the cream.
- 1 package cream cheese (8 ounces), softened: The cream cheese forms the base of the cheesecake layer.
- 1/2 cup powdered sugar: This sweetens the cream cheese and balances the tartness of the strawberries.
- 1 package ladyfingers (24 count): These serve as the cake layer, providing structure and a subtle sweetness.
- 1/4 cup orange liqueur or orange juice: This adds a touch of citrus and moisture to the ladyfingers.
- Fresh mint leaves for garnish: These add a pop of color and a refreshing aroma.
These ingredients are readily available and can be adjusted to suit your taste. For example, if you’re not a fan of orange liqueur, you can use orange juice for a non-alcoholic alternative.
Print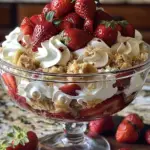
Strawberry Cheesecake Trifle
- Total Time: 4 hours 40 minutes
Description
Strawberry Trifle just screams summer, doesn’t it? With layers of fresh berries, pound cake, and a luscious cheesecake filling, this trifle dessert will be a hit anytime you serve it!
Ingredients
Instructions
- Prep Time: 20 minutes
- Cook Time: 4 hours 20 minutes
Preparing the Whipped Cream and Cream Cheese Mixture
Once you have all your ingredients ready, it’s time to start preparing the different layers for your strawberry cheesecake trifle. This part focuses on creating the whipped cream and cream cheese mixture, which will form the creamy layers of your trifle.
Whipping the Cream
Begin by beating the heavy cream with vanilla extract in a mixing bowl. Use a hand mixer or a stand mixer for this step. Start on a low speed to avoid splattering, then gradually increase to medium-high. Continue whipping until the cream forms soft peaks. This means the cream will hold its shape but still be slightly pliable. Be careful not to over-whip, as this can turn the cream into butter.
Once the whipped cream is ready, set it aside. You’ll need it in the next step when you combine it with the cream cheese mixture.
Making the Cream Cheese Mixture
In a separate mixing bowl, blend the softened cream cheese with powdered sugar until smooth. The cream cheese should be at room temperature to ensure a silky texture. If you find any lumps, keep mixing until the consistency is even.
Next, gently fold the whipped cream into the cream cheese mixture. This step requires a light touch to maintain the airy texture of the whipped cream. Use a spatula to fold the cream into the cream cheese, turning the mixture over from the bottom to the top. This technique ensures that the whipped cream retains its fluffiness, which is key to a light and creamy trifle.