Double Chocolate Cake with Black Velvet Icing

Indulge your sweet tooth with a Double Chocolate Cake with Black Velvet Icing. This rich and moist cake is every chocolate lover’s dream, combining deep chocolate flavors with a sleek black velvet icing that adds a touch of sophistication. Whether you’re making it for a birthday, special event, or just because it’s chocolate cake time, this recipe will have everyone reaching for seconds. In the following sections, we’ll explore the history, ingredients, and step-by-step process to help you create a dessert that’s sure to impress.

Overview of Double Chocolate Cake with Black Velvet Icing

The Double Chocolate Cake with Black Velvet Icing is more than just a dessert—it’s a showstopper. This cake boasts layers of rich chocolate cake with a smooth, creamy black velvet icing. The contrasting textures and deep flavors make it perfect for any celebration or when you simply want to treat yourself.

The cake itself is made with a combination of unsweetened cocoa powder, mayonnaise, and a hint of espresso powder to enhance the chocolate notes. The black velvet icing gets its unique color from Dutch process cocoa powder and features a silky texture thanks to unsalted butter, powdered sugar, and a touch of corn syrup.

One of the best things about this cake is its versatility. You can decorate it to fit any theme or event, from a simple dinner party to a grand wedding. Plus, the icing can be customized to achieve the perfect consistency, whether you prefer it firm for piping or soft for spreading.

In the next section, we’ll dive into the history of chocolate cakes and how they evolved to include unique variations like the Double Chocolate Cake with Black Velvet Icing. Stay tuned for a delicious journey into the origins of this decadent treat.

Print
clock clock iconcutlery cutlery iconflag flag iconfolder folder iconinstagram instagram iconpinterest pinterest iconfacebook facebook iconprint print iconsquares squares iconheart heart iconheart solid heart solid icon
Double Chocolate Cake with Black Velvet Icing

Double Chocolate Cake with Black Velvet Icing


  • Author: Avani

Description

This double chocolate cake is everything a chocolate cake should be: fudgy, moist, intensely chocolaty. When assembled into layers with chocolate ganache slathered in between, as the original recipe instructs, this cake becomes the perfect birthday finale for any chocolate lover; when topped with black velvet icing, as pictured here, this cake becomes an elegant dessert, a perfect treat to enjoy with morning coffee or afternoon espresso.


Ingredients

1 3/4 cups (230g) all-purpose flour
1/4 cup (30g) cornstarch
1 cup (100g) unsweetened cocoa powder
2 teaspoons baking soda
1 teaspoon baking powder
1/2 teaspoon kosher salt
1 cup (200g) granulated sugar
1 cup (205g) dark brown sugar, firmly packed
1/2 cup (108g) vegetable oil
1 cup (230g) mayonnaise
3 whole eggs plus 1 egg yolk
1/2 cup (128g) milk
1 tablespoon vinegar
2 teaspoons vanilla extract
1 cup (240g) hot coffee (or 1 cup hot water mixed with 2 teaspoons instant espresso powder)
For the Chocolate Fudge Frosting :
2 cups (450g) unsalted butter, at room temperature
1 1/2 cups (165g) powdered sugar
3 tablespoons corn syrup
1 teaspoon vanilla extract
A pinch of kosher salt
3/4 cup (177g) warm water
3/4 cup (75g) Dutch process cocoa powder (or unsweetened cocoa powder)
10 oz dark chocolate chips (one bag), melted and slightly cooled

Instructions

Chocolate Cake Preparation:
Preheat your oven to 350°F (177°C) and prepare three 8-inch cake pans by greasing the insides and lining the bottoms with parchment paper. Optionally, wrap the pans with damp cake strips.
Whisk together the flour, cornstarch, cocoa powder, baking soda, baking powder, and salt in a medium bowl. Set aside.
Combine the milk, vinegar, and vanilla in a measuring cup. Set aside.
In a large bowl, whisk the sugars, oil, and mayonnaise until well combined. Mix in the eggs and egg yolk.
Stir in the milk mixture, then gradually mix in half of the dry ingredients until combined. Add the hot coffee, whisking well, followed by the remaining dry ingredients, resulting in a thin, liquid batter.
Divide the batter evenly among the prepared pans.
Bake for 30-35 minutes or until a toothpick inserted in the center comes out clean with a few crumbs attached.
Allow the cakes to cool in the pans for about 10 minutes before running a knife around the edges and turning them out onto a wire rack to cool completely.
For the Chocolate Fudge Frosting :
As the cakes bake, begin the frosting by beating the butter until smooth.
Mix in the powdered sugar, corn syrup, vanilla, and salt.
Dissolve the cocoa powder in the warm water and add to the frosting, mixing until combined.
Stir in the melted chocolate until the frosting is smooth and glossy.
If needed, refrigerate the frosting for about 45 minutes to thicken.
Once chilled, stir the frosting until it’s ready to spread.
Assembling the Cake :
Ensure the cake layers are cool and level the tops if necessary.
Start with one layer on a cake turntable, spreading frosting on top, then stacking the next layer and repeating the frosting.
After stacking, chill the cake for 20 minutes to set the layers before covering the entire cake with frosting.
Once frosted, let the cake set in the refrigerator before serving.
Slice and enjoy this decadent chocolate masterpiece !

The Evolution of Chocolate Cake

Chocolate cake has a rich and fascinating history that spans centuries. It wasn’t always the sweet, velvety dessert we know today. In fact, chocolate itself has evolved from a luxury item enjoyed by ancient civilizations to a staple in many modern desserts.

The story of chocolate cake begins with the Mayans and Aztecs, who revered chocolate as a precious commodity. They used cacao beans to make a bitter beverage, which was often reserved for royalty and religious ceremonies. As European explorers discovered the New World, they brought cacao back to Europe, where it became a favorite among the aristocracy.

In the 19th century, chocolate started to make its way into baked goods. The first known recipe for chocolate cake appeared in an American cookbook in the late 1800s, and it wasn’t long before bakers began experimenting with different forms of chocolate in their cakes. By the 20th century, chocolate cake had become a beloved dessert worldwide.

Today, chocolate cakes come in all shapes and sizes, from simple sponge cakes to elaborate layer cakes with decadent fillings and frostings. The Double Chocolate Cake with Black Velvet Icing represents a modern twist on a classic favorite, blending rich chocolate flavors with a unique, sophisticated icing that adds both visual appeal and intense flavor.

As we continue, let’s take a closer look at the essential ingredients that make this cake so irresistible. Understanding these components will give you the knowledge you need to create a cake that’s both delicious and visually stunning.

The Ingredients

The key to any great dessert is the ingredients. The Double Chocolate Cake with Black Velvet Icing is no exception, with its rich combination of cocoa, butter, and other essential baking staples. This section will break down the crucial elements of the cake and icing, offering tips on selecting the best ingredients for maximum flavor and texture.

Cake Ingredients

To create the rich, fudgy texture of the cake, you’ll need a blend of all-purpose flour, cornstarch, and unsweetened cocoa powder. The flour provides structure, while the cornstarch adds lightness, preventing the cake from becoming too dense. The cocoa powder gives the cake its deep chocolate flavor.

Leavening agents like baking soda and baking powder ensure the cake rises properly, while a pinch of kosher salt enhances the overall flavor. For sweetness, you’ll use a mix of granulated sugar and dark brown sugar, which adds moisture and a hint of molasses.

The wet ingredients include vegetable oil, mayonnaise, eggs, and milk, which contribute to the cake’s moistness and rich taste. The mayonnaise might sound unusual, but it adds a creamy texture without overpowering the chocolate flavor. You’ll also need vinegar, vanilla extract, and hot coffee (or a mix of hot water and espresso powder) to bring out the deep chocolate notes.

Black Velvet Icing Ingredients

The icing for this cake is what gives it its signature “black velvet” look. You’ll need unsalted butter, powdered sugar, corn syrup, vanilla extract, and kosher salt. The butter provides a rich base for the icing, while the powdered sugar offers sweetness and a smooth texture.

To create the striking black color, you’ll use Dutch process cocoa powder, which is darker and less acidic than regular cocoa powder. The addition of warm water helps dissolve the cocoa powder, ensuring a consistent texture. Finally, the dark chocolate chips, melted and slightly cooled, give the icing a glossy finish.

In the next section, we’ll walk through the step-by-step process of making the cake, from preparing the batter to baking and cooling the layers. With these ingredients in hand, you’re ready to create a dessert that will impress even the most discerning chocolate lovers.

The Baking Process

Now that you’ve got your ingredients lined up, it’s time to get baking! This section will guide you through the step-by-step process of creating the Double Chocolate Cake with Black Velvet Icing. From mixing the batter to baking and cooling the cake layers, each step is crucial to achieving the perfect result.

Step-by-Step Instructions for Making the Cake

Start by preheating your oven to 350°F (177°C). While the oven is heating, prepare three 8-inch cake pans by greasing the insides and lining the bottoms with parchment paper. This step is key to ensure your cake layers come out clean and intact. If you have cake strips, you can wrap them around the pans to help the cake bake evenly.

In a medium bowl, whisk together the dry ingredients: flour, cornstarch, cocoa powder, baking soda, baking powder, and kosher salt. This ensures the leavening agents are evenly distributed throughout the cake batter.

Next, combine the wet ingredients. In a large bowl, whisk the granulated sugar, dark brown sugar, vegetable oil, and mayonnaise until they’re well combined. Add the eggs and egg yolk, beating until the mixture is smooth. Stir in the milk, vinegar, and vanilla extract, then gradually mix in half of the dry ingredients. Be sure not to overmix—just enough to incorporate the dry ingredients.

At this point, it’s time to add the hot coffee (or hot water with espresso powder). This ingredient brings out the rich chocolate flavor and makes the batter quite thin, but that’s okay—it’s supposed to be this way. Once the coffee is mixed in, add the remaining dry ingredients, stirring until just combined.

Divide the batter evenly among the prepared cake pans. A handy trick is to use a kitchen scale to ensure each pan has an equal amount of batter, which helps the cakes bake evenly. Place the pans in the oven and bake for 30-35 minutes. Check the cakes by inserting a toothpick into the center—if it comes out clean or with a few crumbs, they’re done.

Allow the cakes to cool in the pans for about 10 minutes. Afterward, run a knife around the edges and carefully turn the cakes out onto a wire rack to cool completely. Cooling is essential before frosting, as warm cakes can cause the icing to melt and slide off.

With the cake layers baked and cooling, the next step is to make the black velvet icing. Stay tuned as we walk you through creating a smooth, rich frosting that’s perfect for this decadent cake.

Making the Black Velvet Icing

The black velvet icing is the pièce de résistance of this cake. Its deep, rich color and velvety texture make it both visually striking and deliciously indulgent. Here’s a step-by-step guide to creating the perfect frosting for your Double Chocolate Cake with Black Velvet Icing.

Step-by-Step Instructions for Black Velvet Icing

Start by ensuring your butter is at room temperature. This is crucial for achieving a smooth and creamy texture. In a large mixing bowl, beat the unsalted butter until it’s soft and fluffy. This can take a few minutes, so be patient. Once the butter is ready, gradually add the powdered sugar, continuing to mix until it’s well incorporated. Be sure to scrape down the sides of the bowl to ensure everything is evenly mixed.

Next, add the corn syrup, which gives the icing a glossy finish, and the vanilla extract for flavor. Toss in a pinch of kosher salt to balance out the sweetness. The combination of these ingredients creates a solid base for the icing.

Now, it’s time to bring in the black cocoa powder. Dissolve it in warm water, making sure there are no lumps, and then add it to the icing. This is what gives the frosting its unique dark color and deep chocolate flavor. Stir until everything is well combined.

To finish off the icing, mix in the melted dark chocolate chips. Make sure the chocolate has cooled slightly before adding it to the icing to prevent it from melting the butter and causing a runny consistency. Mix until the frosting is smooth and glossy. If the icing seems too thin, refrigerate it for about 45 minutes to let it firm up a bit.

Once the icing has thickened, give it a final stir to ensure it’s ready for spreading. At this stage, you can also taste and adjust for sweetness or chocolate flavor. If it’s too sweet, a tiny pinch of salt can help balance it out.

With the black velvet icing ready to go, it’s time to assemble the cake. In the next section, we’ll cover how to stack and frost the cake layers to create a stunning and delicious masterpiece. Stay tuned for tips on assembly and decoration that will make your cake a showstopper at any event.

Assembling the Cake Layers

The moment has arrived! With the cake layers cooled and the black velvet icing prepared, it’s time to assemble and frost your Double Chocolate Cake with Black Velvet Icing. This part requires a bit of patience and precision, but with the right approach, you’ll have a beautifully layered cake that’s as impressive as it is delicious.

Step-by-Step Instructions for Assembling the Cake

First, ensure the cake layers are completely cool. If they’re even slightly warm, the icing could melt, resulting in a messy and unstable cake. If needed, you can place the cake layers in the refrigerator for a few minutes to help them cool down faster.

Before you start stacking, check each layer for evenness. If the tops are domed or uneven, use a serrated knife to level them. This step is crucial for stability and ensures the layers sit flat on top of each other.

Now, place the first cake layer on a cake turntable or a flat serving plate. This gives you better control and allows you to rotate the cake as you apply the icing. Spread a generous layer of the black velvet icing on top, smoothing it with an offset spatula. Aim for an even thickness across the entire layer.

Add the second cake layer on top of the first, pressing down gently to ensure it’s level. Repeat the process of spreading the icing, making sure it reaches the edges. If you’re feeling adventurous, you can add a filling like chocolate ganache or fruit preserves between the layers for extra flavor.

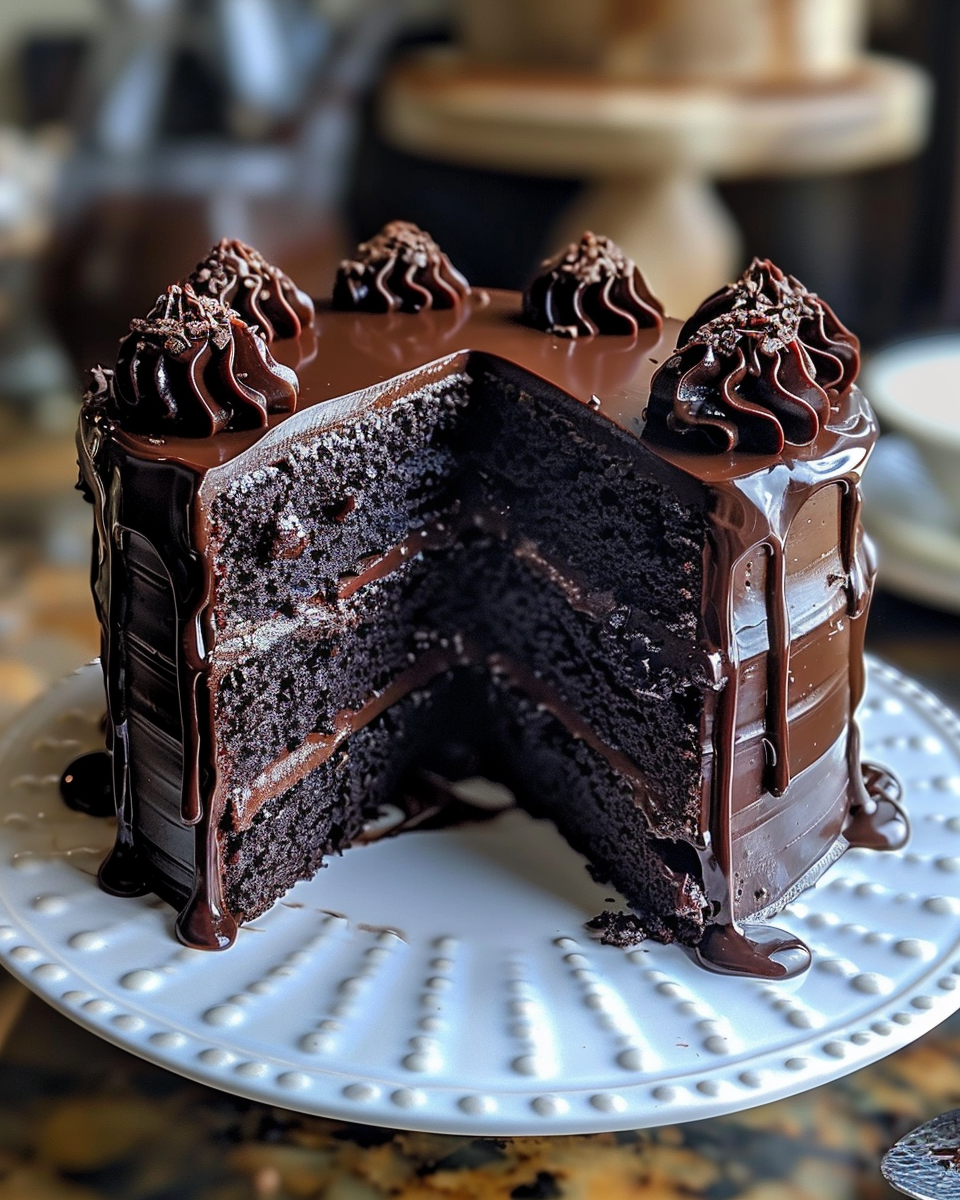
Place the third and final layer on top, aligning it with the other layers. Spread a thin layer of icing on the sides and top of the cake. This is known as a “crumb coat” and helps to seal in any loose crumbs before you apply the final layer of icing. Once you’ve applied the crumb coat, chill the cake in the refrigerator for about 20 minutes to let it set.

Applying the Final Layer of Icing

After the crumb coat has set, it’s time to apply the final layer of icing. Spread a thicker layer of black velvet icing over the entire cake, using your spatula to create smooth edges and a flat top. For a professional touch, you can use a bench scraper or a cake smoother to achieve a flawless finish.

If you prefer a more rustic look, you can create swirls and patterns in the icing using the spatula. This is a great way to add texture and personality to your cake. For an extra touch of elegance, consider adding a ganache drip, which involves pouring melted chocolate over the edges to create a decorative drip effect.

With the cake fully assembled and frosted, it’s ready for any finishing touches. In the next section, we’ll explore some decoration ideas and serving suggestions to help you present your cake in the most appealing way possible. Get ready to impress your guests with a dessert that’s as stunning as it is delicious.

Decorating and Serving Suggestions

Now that your Double Chocolate Cake with Black Velvet Icing is fully assembled and frosted, it’s time to get creative with decorations and think about the best ways to serve this delectable dessert. Whether you’re going for a simple, elegant look or a more elaborate design, these suggestions will help you take your cake to the next level.

Decorating Ideas for Double Chocolate Cake

If you’re aiming for a minimalist approach, a simple, smooth finish with a few edible decorations can be striking. Consider using chocolate shavings, sprinkles, or edible gold leaf to add a touch of sparkle. For a dramatic effect, create a ganache drip around the edges of the cake. To do this, melt dark chocolate with a splash of cream, then carefully pour it over the top, letting it cascade down the sides.

If you want to add a burst of color, fresh berries like raspberries or strawberries are a great option. They not only provide a pop of brightness but also complement the rich chocolate flavor. Arrange them in a decorative pattern on top of the cake for an eye-catching presentation.

For a more intricate design, use piping bags and different tips to create decorative swirls or borders. You can even incorporate other elements like marzipan flowers or sugar art to give your cake a unique touch. If you’re making this cake for a special occasion, consider adding a personalized cake topper or themed decorations to match the event.

Serving Suggestions for Double Chocolate Cake

When it comes to serving this cake, there are a few things to keep in mind. For the best flavor, let the cake sit at room temperature for about 30 minutes before slicing. This allows the icing to soften slightly and the flavors to meld together.

To serve, use a sharp knife and clean it between slices to maintain a neat presentation. Pair each slice with a dollop of whipped cream or a scoop of vanilla ice cream for a delightful contrast in textures. If you want to get fancy, drizzle some chocolate sauce on the plate before placing the cake slice on top.

When storing the cake, keep it in an airtight container to prevent it from drying out. If you need to make the cake ahead of time, it can be refrigerated for a few days or frozen for longer storage. Just be sure to wrap it tightly to preserve its moisture.

With these decoration and serving tips, you’re all set to enjoy your Double Chocolate Cake with Black Velvet Icing. But before you dive in, let’s address some common questions and potential issues that might come up when making this cake. In the next section, we’ll cover frequently asked questions to help you troubleshoot and get the most out of this recipe. Stay tuned for valuable insights and tips!

Frequently Asked Questions (FAQs) About Double Chocolate Cake

Before you slice into your Double Chocolate Cake with Black Velvet Icing, it’s worth addressing some of the most common questions that arise when making this delightful dessert. Whether you’re curious about ingredient substitutions or storage tips, this section has you covered.

What is Black Cocoa Powder, and Where Can I Find It?

Black cocoa powder is a type of Dutch-process cocoa that’s been heavily alkalized, giving it a darker color and a smoother, less acidic flavor. It’s what gives the black velvet icing its distinct deep hue. You can find black cocoa powder at specialty baking shops or online retailers. If you can’t find it, regular Dutch-process cocoa can be used, but the color and flavor might differ slightly.

Can I Use a Different Type of Cocoa Powder?

Absolutely! If you don’t have black cocoa powder, you can use regular unsweetened cocoa powder or Dutch-process cocoa powder. Just keep in mind that the icing might not have the same intense black color, but it will still taste great.

How Do I Prevent the Cake from Drying Out?

To ensure your cake stays moist, make sure you don’t overbake it. Check the cake’s doneness with a toothpick or cake tester; it should come out with a few crumbs, not completely clean. Additionally, store the cake in an airtight container to keep it from drying out. If you need to refrigerate it, wrap it tightly in plastic wrap to maintain its moisture.

What’s the Best Way to Store the Cake?

Once your cake is frosted, you can keep it at room temperature for up to two days. If you need to store it longer, refrigerate it in an airtight container. For even longer storage, you can freeze the cake—just make sure to wrap it tightly to avoid freezer burn. When you’re ready to enjoy it, let it thaw in the refrigerator overnight before serving.

Can I Freeze the Cake for Later Use?

Yes, you can! If you’d like to make the cake ahead of time, freezing is a great option. To freeze, wrap the unfrosted cake layers individually in plastic wrap and then aluminum foil. This helps protect them from freezer burn. When you’re ready to assemble the cake, let the layers thaw at room temperature, then proceed with frosting and decorating as usual.

These FAQs should help you troubleshoot any issues and give you confidence as you create your Double Chocolate Cake with Black Velvet Icing. In the next section, we’ll wrap things up with some final thoughts on this delicious dessert. Don’t miss out on the chance to savor a slice of this decadent cake!

Conclusion

The Double Chocolate Cake with Black Velvet Icing is a dessert that truly has it all—rich, decadent flavors, a velvety texture, and a stunning appearance that makes it a showstopper at any event. Whether you’re baking for a birthday, a special celebration, or just because you want to indulge, this cake is sure to impress.

We’ve covered a lot in this article, from the history and evolution of chocolate cakes to the essential ingredients and step-by-step baking process. You’ve also learned how to make the black velvet icing that gives this cake its unique color and smooth texture. Additionally, we’ve explored various decoration and serving suggestions to help you present your cake with flair.

The FAQs section addressed common questions and provided tips on storing and freezing the cake, ensuring you have all the information you need to make this dessert a success. By following these guidelines, you’ll be able to create a cake that’s not only delicious but also visually stunning.

As you embark on your baking journey, remember that the key to a great cake is a blend of patience, creativity, and a little bit of experimentation. Don’t be afraid to try new decorating techniques or add your own personal touches to make the cake uniquely yours.

We hope this guide has inspired you to try your hand at making the Double Chocolate Cake with Black Velvet Icing. Whether you’re a seasoned baker or just starting out, this cake is a rewarding project that will leave a lasting impression. So, grab your apron, preheat your oven, and get ready to enjoy a slice of chocolate heaven. Happy baking!

Leave a Comment

Recipe rating