Blackberry Vanilla Hazelnut Tart

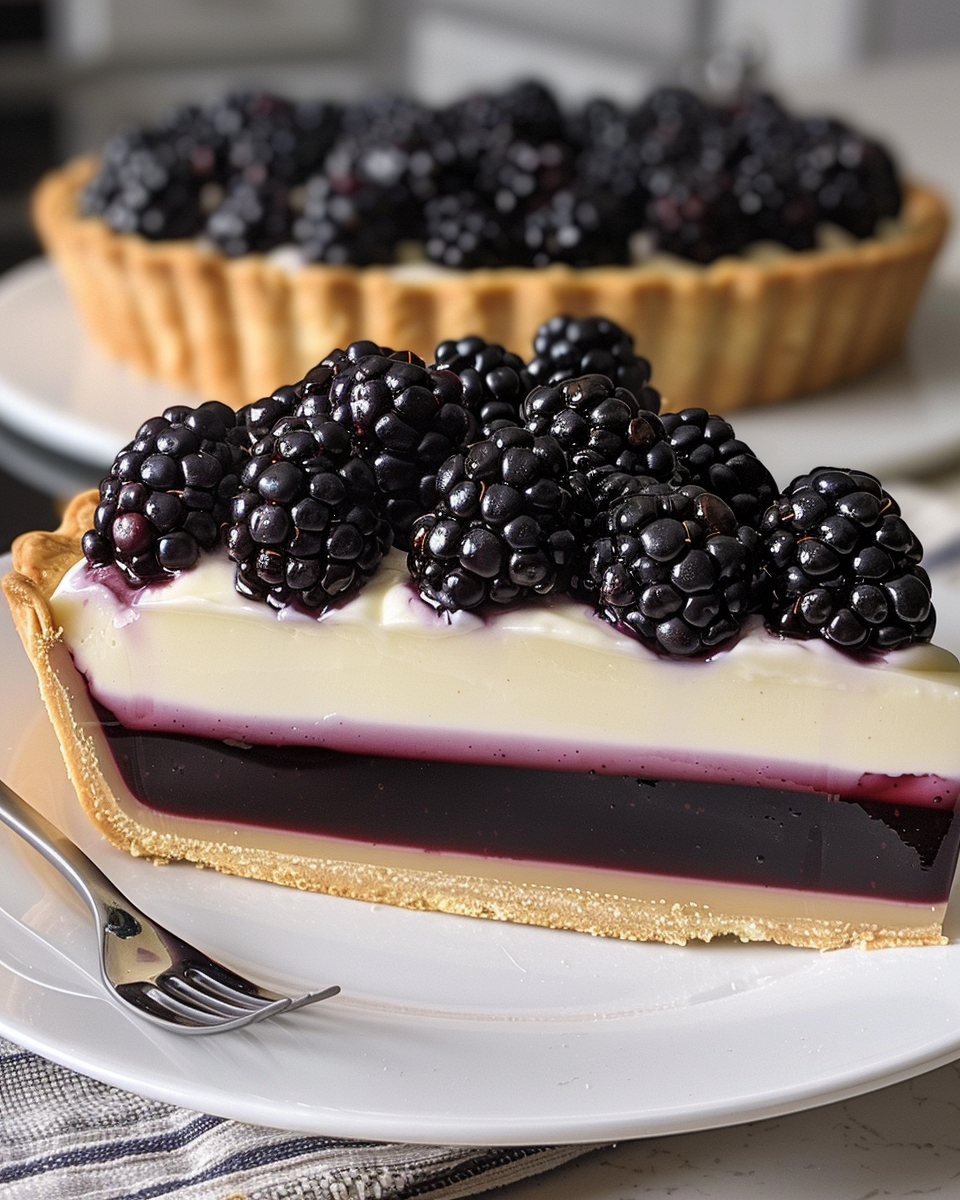
The Blackberry Vanilla Hazelnut Tart is a decadent dessert that combines rich, creamy vanilla, crunchy hazelnuts, and the tartness of fresh blackberries. This dessert is perfect for special occasions or whenever you’re in the mood for something sweet yet sophisticated. The multiple layers of flavor and texture in this tart make it a standout dish, while the use of fresh ingredients and precise preparation techniques give it a homemade touch.

This article will guide you through the process of making this delightful tart, starting with the vanilla dome, followed by the shortcrust pastry, hazelnut cream, blackberry confit, and the glossy blackberry frosting that ties everything together. Let’s dive into the first part of this recipe journey: preparing the vanilla dome.

Print
clock clock iconcutlery cutlery iconflag flag iconfolder folder iconinstagram instagram iconpinterest pinterest iconfacebook facebook iconprint print iconsquares squares iconheart heart iconheart solid heart solid icon
Blackberry Vanilla Hazelnut Tart

Blackberry Vanilla Hazelnut Tart


  • Author: Avani

Description

Indulge in the heavenly combination of juicy blackberries, rich vanilla, and nutty hazelnut with this delightful Blackberry Vanilla Hazelnut Tart recipe. Perfect for a cozy gathering or a sweet family dessert, this tart offers a symphony of flavors and textures that will leave your taste buds craving for more.


Ingredients

For the Vanilla Dome:
1.5 g gelatin
60 g whole milk
90 g white chocolate
137 g whole whipping cream
2 vanilla pods
For the Shortcrust Pastry:
130 g soft butter
260 g flour
90 g icing sugar
30 g hazelnut powder
2 g salt
1 egg
Gilding: 1 egg yolk + 3 g liquid cream
For the Hazelnut Cream:
35 g soft butter
35 g icing sugar
35 g hazelnut powder
35 g egg
For the Blackberry Confit:
300 g blackberries
40 g sugar
4 g NH pectin
For the Frosting:
35 g water
55 g powdered sugar
12 g glucose syrup
35 g liquid cream
50 g white chocolate
3 g gelatin (200 blooms)
25 g blackberry puree

Instructions

D-1: The Vanilla Dome:
Whip the whipping cream and set aside in the fridge.
Hydrate the gelatin in cold water.
Melt the white chocolate and heat the milk.
Mix the milk and gelatin, then pour over the melted chocolate. Add vanilla seeds.
Fold in the whipped cream and pour into the dome mold. Freeze overnight.
D-Day:
For the Shortcrust Pastry:
Mix butter, flour, icing sugar, hazelnut powder, and salt until crumbled.
Add egg and mix until dough forms. Chill for 30 minutes.
Roll out dough and line tart shell. Chill for 45 minutes.
Bake blind at 160°C for 15 minutes. Brush with egg wash.
Hazelnut Cream:
Mix butter, icing sugar, hazelnut powder, and egg.
Pour into tart shell and bake at 160°C for 10-15 minutes.
Blackberry Confit:
Heat blackberries, then mix with sugar and pectin.
Boil until thickened. Cool and pour over tart base. Chill overnight.
Frosting:
Soak gelatin in cold water.
Mix chocolate and cream in a bowl.
Heat water, glucose, and sugar until 103°C. Pour into bowl with gelatin.
Add blackberry puree. Blend without incorporating air.
When frosting reaches 35-38°C, pour over frozen dome. Place on tart.
Decorate with blackberries. Chill for 2-3 hours before serving.
Enjoy your Blackberry Vanilla Hazelnut Tart!

Part 1: Preparing the Vanilla Dome

The vanilla dome is a key component of the Blackberry Vanilla Hazelnut Tart, adding a creamy texture and rich vanilla flavor. To create this element, you’ll need to work with gelatin, white chocolate, and whipped cream to achieve the desired consistency and structure. Here’s how to make it:

Ingredients for the Vanilla Dome

  • 1.5 g gelatin
  • 60 g whole milk
  • 90 g white chocolate
  • 137 g whole whipping cream
  • 2 vanilla pods (for vanilla seeds)

Step-by-Step Instructions

  1. Whip the Cream: Begin by whipping the whole whipping cream until soft peaks form. Once done, set it aside in the refrigerator to keep it chilled.
  2. Hydrate the Gelatin: Place the gelatin in cold water to soften it. This step is crucial for achieving a smooth and stable texture in the dome.
  3. Melt the White Chocolate: Using a microwave or double boiler, melt the white chocolate until smooth. Be careful not to overheat it, as this can cause the chocolate to seize.
  4. Heat the Milk: Warm the whole milk in a small saucepan. Ensure it’s heated but not boiling, as you don’t want to scorch the milk.
  5. Mix Gelatin and Milk: Once the gelatin has softened, squeeze out any excess water and add it to the warm milk. Stir until the gelatin has completely dissolved.
  6. Combine Milk and Chocolate: Pour the milk and gelatin mixture over the melted white chocolate. Stir until well combined and smooth.
  7. Add Vanilla Seeds: Cut the vanilla pods lengthwise and scrape out the seeds. Add these seeds to the milk and chocolate mixture, ensuring they’re evenly distributed.
  8. Fold in Whipped Cream: Gently fold the whipped cream into the milk and chocolate mixture. Take care not to deflate the cream, as this helps create the dome’s light and airy texture.
  9. Pour into Dome Mold: Once everything is well combined, pour the mixture into a dome-shaped mold. Smooth the top to ensure an even surface.
  10. Freeze Overnight: Place the dome mold in the freezer and allow it to set overnight. This step is crucial for achieving the right shape and texture.

With the vanilla dome prepared and freezing, you can proceed to the next part: creating the shortcrust pastry for the tart base.

Part 2: Crafting the Shortcrust Pastry

The shortcrust pastry serves as the foundation for the Blackberry Vanilla Hazelnut Tart, providing a buttery, flaky base that complements the other flavors and textures in the dessert. In this part, you’ll learn how to create a pastry that’s both tender and sturdy enough to hold the tart’s various components.

Ingredients for the Shortcrust Pastry

  • 130 g soft butter
  • 260 g flour
  • 90 g icing sugar
  • 30 g hazelnut powder
  • 2 g salt
  • 1 egg
  • Egg wash: 1 egg yolk mixed with 3 g liquid cream

Step-by-Step Instructions

  1. Mix the Dry Ingredients: In a large mixing bowl, combine the flour, icing sugar, hazelnut powder, and salt. Stir until the ingredients are evenly distributed.
  2. Add the Butter: Cut the soft butter into small pieces and add it to the dry ingredients. Use your hands or a pastry cutter to rub the butter into the flour mixture until it resembles coarse crumbs. The key is to avoid over-mixing, as this can lead to a tough pastry.
  3. Add the Egg: Crack the egg into the mixture and combine it until the dough begins to come together. If the dough seems too dry, add a small amount of cold water, a teaspoon at a time, until the dough forms a cohesive ball.
  4. Chill the Dough: Wrap the dough in plastic wrap and refrigerate it for at least 30 minutes. Chilling helps firm the dough and makes it easier to roll out.
  5. Roll Out the Dough: After chilling, lightly flour your work surface and roll out the dough to about 1/8 inch (3 mm) thickness. Ensure it’s large enough to fit into your tart pan with some overhang.
  6. Line the Tart Pan: Carefully lift the rolled dough and place it into your tart pan, pressing it gently into the corners and up the sides. Trim any excess dough from the edges.
  7. Chill Again: Once the tart shell is lined, chill it in the refrigerator for another 45 minutes. This additional chilling helps prevent the pastry from shrinking during baking.
  8. Blind Baking: Preheat your oven to 160°C (320°F). Line the tart shell with parchment paper and fill it with baking weights or dried beans. Bake for about 15 minutes to set the pastry.
  9. Apply the Egg Wash: Remove the parchment paper and baking weights. Brush the tart shell with the egg wash to give it a golden color during the final bake.
  10. Bake Again: Return the tart shell to the oven and bake for another 10-15 minutes, or until the edges are golden brown and the base is firm to the touch.

With the shortcrust pastry ready, you’re set for the next step: creating the hazelnut cream filling. This rich, nutty layer complements the other flavors in the tart and adds a touch of decadence.

Part 3: Creating the Hazelnut Cream Filling

The hazelnut cream filling adds a rich and nutty flavor to the Blackberry Vanilla Hazelnut Tart, providing a delightful contrast to the vanilla dome and the blackberry confit. In this section, you’ll learn how to make this creamy filling that sits atop the shortcrust pastry base.

Ingredients for the Hazelnut Cream

  • 35 g soft butter
  • 35 g icing sugar
  • 35 g hazelnut powder
  • 35 g egg

1-Step-by-Step Instructions

  1. Cream the Butter and Sugar: In a mixing bowl, cream the soft butter and icing sugar until light and fluffy. This step is crucial for creating a smooth texture in the hazelnut cream.
  2. Add the Hazelnut Powder: Gradually add the hazelnut powder to the butter and sugar mixture, blending it until it’s well incorporated. This adds a nutty depth to the filling.
  3. Incorporate the Egg: Crack the egg into the mixture and stir until fully combined. The egg acts as a binder, giving the hazelnut cream its structure.
  4. Pour into the Tart Shell: Once the hazelnut cream is ready, carefully pour it into the pre-baked tart shell. Spread it evenly across the base using a spatula or the back of a spoon.
  5. Bake the Tart with Hazelnut Cream: Return the tart to the oven and bake at 160°C (320°F) for 10-15 minutes. The hazelnut cream should set and take on a light golden color.
  6. Cool Before Adding Other Layers: After baking, let the tart cool completely. This step is important to ensure that the hazelnut cream is stable before adding the blackberry confit and other toppings.

With the hazelnut cream filling baked and cooled, the tart is ready for the next layer: the blackberry confit. This sweet and tangy layer brings a burst of flavor and a vibrant color to the tart. The following section will guide you through the process of creating this delicious addition.

Part 4: Preparing the Blackberry Confit

The blackberry confit brings a burst of sweet and tangy flavors to the Blackberry Vanilla Hazelnut Tart, providing a vibrant contrast to the creamy and nutty elements. This section covers the preparation of the confit and how it integrates into the tart’s overall structure.

Ingredients for the Blackberry Confit

  • 300 g blackberries
  • 40 g sugar
  • 4 g NH pectin

2-Step-by-Step Instructions

  1. Prepare the Blackberries: Rinse the blackberries under cold water and let them drain thoroughly. This ensures that any dirt or debris is removed before cooking.
  2. Mix the Sugar and Pectin: In a small bowl, combine the sugar and NH pectin. Mixing these two ingredients helps the pectin distribute evenly in the confit, ensuring a consistent texture.
  3. Cook the Blackberries: In a saucepan over medium heat, add the blackberries and start cooking them. As they heat up, the blackberries will release their juices and begin to break down.
  4. Add the Sugar and Pectin: Gradually add the sugar and pectin mixture to the blackberries, stirring constantly to prevent lumps from forming. Continue cooking until the mixture thickens and becomes glossy, usually 5-10 minutes.
  5. Boil and Thicken: Bring the mixture to a gentle boil and let it cook for a few minutes to activate the pectin. This process ensures that the confit will set properly once it cools.
  6. Cool the Confit: Once the confit has thickened, remove it from heat and let it cool to room temperature. It should be thick but spreadable, ideal for layering onto the tart.
  7. Pour Over the Tart Base: After the confit has cooled, pour it over the hazelnut cream layer in the tart shell. Spread it evenly with a spatula, ensuring a smooth surface.
  8. Chill Overnight: Once the confit is in place, refrigerate the tart overnight to allow the confit to set completely. This step is crucial for the tart’s structure and ensures that each layer stays in place.

With the blackberry confit set and chilled, the tart is nearly complete. The final step is to create the blackberry frosting and assemble the tart with all its layers. This step involves creating a glossy, smooth frosting that will coat the vanilla dome and add a professional finish to the tart. The next section will guide you through this final stage of preparation.

Part 5: Assembling and Decorating the Tart

The final step in creating the Blackberry Vanilla Hazelnut Tart is assembling the components and adding a glossy blackberry frosting for an elegant finish. This step-by-step guide will help you achieve a smooth, eye-catching tart that’s ready to impress.

Ingredients for the Frosting

  • 35 g water
  • 55 g powdered sugar
  • 12 g glucose syrup
  • 35 g liquid cream
  • 50 g white chocolate
  • 3 g gelatin (200 blooms)
  • 25 g blackberry puree

3-Step-by-Step Instructions

  1. Soak the Gelatin: Place the gelatin in cold water to hydrate and soften it. This step is essential for achieving a smooth and stable frosting.
  2. Prepare the Frosting Base: In a saucepan over medium heat, combine the water, glucose syrup, and powdered sugar. Stir until the sugar dissolves and the mixture reaches a temperature of 103°C (217°F).
  3. Add the Gelatin and Chocolate: Once the syrup mixture reaches the desired temperature, remove it from heat. Squeeze out excess water from the gelatin and add it to the mixture, stirring until dissolved. Add the white chocolate and stir until completely melted and smooth.
  4. Mix in the Cream and Blackberry Puree: Pour the liquid cream into the frosting base and stir until well combined. Add the blackberry puree, ensuring it’s evenly distributed throughout the mixture.
  5. Blend the Frosting: Using an immersion blender, blend the frosting to ensure a smooth consistency. Be careful not to incorporate air, as this can cause bubbles in the frosting.
  6. Cool the Frosting: Allow the frosting to cool to a temperature between 35°C and 38°C (95°F – 100°F) before pouring. This temperature range ensures the frosting is the right consistency for pouring and will create a smooth, glossy finish.
  7. Assemble the Tart: Remove the vanilla dome from the freezer and place it on a wire rack. Carefully pour the cooled frosting over the dome, allowing it to flow down the sides and create an even coating. Use a spatula to smooth out any imperfections if necessary.
  8. Place the Dome on the Tart: Once the frosting has set, carefully transfer the vanilla dome to the center of the tart, atop the blackberry confit layer.
  9. Decorate the Tart: Add additional blackberries and chocolate shavings around the dome for a decorative touch. This not only enhances the visual appeal but also adds extra flavor.
  10. Chill Before Serving: Once assembled, chill the tart in the refrigerator for 2-3 hours to ensure everything is set and firm. This step is crucial for achieving the perfect texture and presentation.

With the tart assembled and decorated, it’s ready to serve. The Blackberry Vanilla Hazelnut Tart combines the creamy richness of vanilla, the nutty notes of hazelnut, and the tartness of blackberries, all wrapped in a decadent frosting. Serve it at your next gathering or enjoy it as a special treat for yourself and your loved ones.

Serving the Blackberry Vanilla Hazelnut Tart

To serve the tart, follow these steps:

  1. Ensure Proper Chilling: Before serving, make sure the tart has been properly chilled for at least 2-3 hours. This helps ensure that the layers set and don’t collapse when sliced.
  2. Use a Sharp Knife: To cut the tart, use a sharp, serrated knife to avoid crushing the layers. Gently saw back and forth, rather than pressing down, for a clean cut.
  3. Portion Size: Cut the tart into wedges of your desired size. Given its rich components, smaller slices may be preferable.
  4. Serve Chilled: The tart is best served chilled, but it can be left at room temperature for 10-15 minutes before serving to allow the flavors to bloom.
  5. Garnish: For an extra touch, add a few fresh blackberries and some hazelnut shavings on each plate for garnish.

Storing the Tart

To keep the tart fresh, follow these storage tips:

  1. Refrigerate: Store the tart in the refrigerator, either in its original tart pan or on a serving plate. Cover it with plastic wrap or aluminum foil to prevent it from drying out or absorbing other refrigerator odors.
  2. Avoid Freezing: While some tarts can be frozen, the various components in this tart (such as the vanilla dome and hazelnut cream) may not hold up well to freezing and thawing.
  3. Shelf Life: The tart should remain fresh in the refrigerator for 3-4 days. After that, the quality may decline.

Customization Tips

If you’d like to personalize the tart, consider these options:

  1. Alternative Fruits: While blackberries are a key component, you can experiment with other berries like raspberries or blueberries for a different flavor profile.
  2. Different Crusts: The shortcrust pastry can be replaced with a different type of base, like a graham cracker crust or a chocolate cookie crust.
  3. Additional Toppings: Add a drizzle of chocolate sauce or a dusting of powdered sugar for extra visual appeal.

Troubleshooting Common Issues

If you encounter any issues while making the tart, these tips might help:

  1. Vanilla Dome Collapsing: Ensure the dome is completely frozen before assembling. If it’s too soft, it won’t hold its shape.
  2. Crust Shrinking: Chilling the crust before baking and using baking weights during blind baking can prevent this problem.
  3. Confit Not Setting: If the confit is too runny, you may need to cook it longer to activate the pectin fully.

With these tips in mind, you’re ready to enjoy your Blackberry Vanilla Hazelnut Tart. Whether it’s for a special occasion or a delightful dessert at home, this tart is sure to impress with its sophisticated flavors and elegant presentation.

More Tips for Making a Perfect Blackberry Vanilla Hazelnut Tart

While we’ve covered the main steps for making a Blackberry Vanilla Hazelnut Tart, let’s delve into additional tips and tricks to ensure your tart turns out perfectly. From equipment to presentation, these insights will help you refine your technique and deliver a dessert that looks as amazing as it tastes.

Equipment Suggestions

Using the right equipment can make a significant difference in the outcome of your tart. Here are some key tools to have on hand:

  1. Tart Pan with Removable Bottom: This type of pan allows you to easily remove the tart without damaging it. Look for a pan with a non-stick surface for easier release.
  2. Parchment Paper: Line your tart pan with parchment paper to prevent sticking and to aid in the removal process.
  3. Pastry Blender: For the shortcrust pastry, a pastry blender helps mix the butter into the flour, creating a crumbly texture.
  4. Wire Cooling Rack: Once your tart is baked, a cooling rack allows for even cooling and prevents sogginess on the bottom.
  5. Offset Spatula: This tool is perfect for spreading fillings and frosting evenly.

Presentation and Decoration Ideas

A beautifully presented tart is sure to impress. Here are some suggestions for making your tart look as good as it tastes:

  1. Decorative Edges: Use a fork or a crimper to create decorative edges on your shortcrust pastry before baking.
  2. Additional Toppings: Beyond blackberries, consider adding other toppings like fresh mint leaves, chocolate curls, or a light dusting of cocoa powder for a touch of elegance.
  3. Serving Platter: Present the tart on a large, flat serving platter to give it the spotlight it deserves.
  4. Serving Utensils: Use a pie server or a large spatula to serve the tart without damaging it.

Safety and Food Handling

When preparing any dessert, it’s crucial to follow proper food handling and safety guidelines. Here’s what to keep in mind:

  1. Temperature Control: Keep perishable ingredients, like cream and butter, refrigerated until ready to use.
  2. Clean Work Surfaces: Ensure all your work surfaces and equipment are clean and sanitized to avoid contamination.
  3. Proper Storage: Once the tart is assembled, store it in the refrigerator to prevent spoilage.

Experimenting with Flavors

If you want to experiment with flavors, consider these ideas to customize your tart:

  1. Infusing Vanilla: To enhance the vanilla flavor, consider infusing the cream with a split vanilla bean before whipping it for the dome.
  2. Alternative Nuts: If hazelnuts aren’t your preference, try using almonds or pecans for a different nutty profile.
  3. Flavored Frosting: Instead of blackberry, you could experiment with other fruit purees for the frosting, like raspberry or blueberry, to change up the flavor.

With these additional tips and suggestions, you’re equipped to create a Blackberry Vanilla Hazelnut Tart that not only delights the taste buds but also captures attention with its visual appeal. Enjoy the process, and savor the results with friends and family.

Conclusion:

The Blackberry Vanilla Hazelnut Tart is a delightful combination of rich flavors and unique textures. Throughout this article, we explored the various components that make this tart a standout dessert, from its flaky shortcrust pastry and creamy vanilla dome to the vibrant blackberry confit and nutty hazelnut cream.

This tart’s versatility allows for customization to suit different tastes and occasions. Whether you’re serving it at a dinner party, a holiday gathering, or simply enjoying it with family, the tart’s elegant appearance and exquisite flavor profile are sure to impress.

The beauty of this tart lies in its balance of flavors—sweet, creamy, nutty, and tangy—creating a dessert that’s as visually appealing as it is delicious. We encourage you to try this recipe and experiment with your own creative variations, whether it’s by adding different fruits, changing the crust, or incorporating new toppings. The possibilities are endless, making this tart a true crowd-pleaser.

Leave a Comment

Recipe rating