Homemade Hostess Cupcakes

Making Homemade Hostess Cupcakes is a fun and delightful baking experience. You get to create those classic treats from scratch, tweaking them to suit your taste. This article explores every step of the process, from mixing the perfect chocolate cupcake batter to whipping up a fluffy cream filling and crafting a rich ganache topping. Ready to dive in? Let’s start with Part 1.

Introduction to Homemade Hostess Cupcakes

Hostess Cupcakes have been an iconic American treat for decades. Those fluffy chocolate cupcakes with their signature white swirl on top and creamy filling are beloved by kids and adults alike. But why settle for the store-bought version when you can make your own at home? With homemade Hostess cupcakes, you control the ingredients, ensuring a fresh and delicious result every time.

One of the biggest reasons to go homemade is the flavor. When you create these cupcakes from scratch, you can adjust the sweetness and experiment with different types of chocolate, vanilla, or other flavorings. Plus, there’s something special about biting into a freshly baked cupcake with a rich cream filling and smooth ganache topping that you just can’t get from a package.

As we go through this recipe, you’ll learn all the essential ingredients, tools, and steps to make your own homemade Hostess cupcakes. Whether you’re a baking pro or just getting started, you’ll find this guide helpful in creating a batch of cupcakes that will impress your friends and family. So, let’s get baking!

Print
clock clock iconcutlery cutlery iconflag flag iconfolder folder iconinstagram instagram iconpinterest pinterest iconfacebook facebook iconprint print iconsquares squares iconheart heart iconheart solid heart solid icon
Homemade Hostess Cupcakes

Homemade Hostess Cupcakes


  • Author: Avani
  • Total Time: 45 minutes

Description

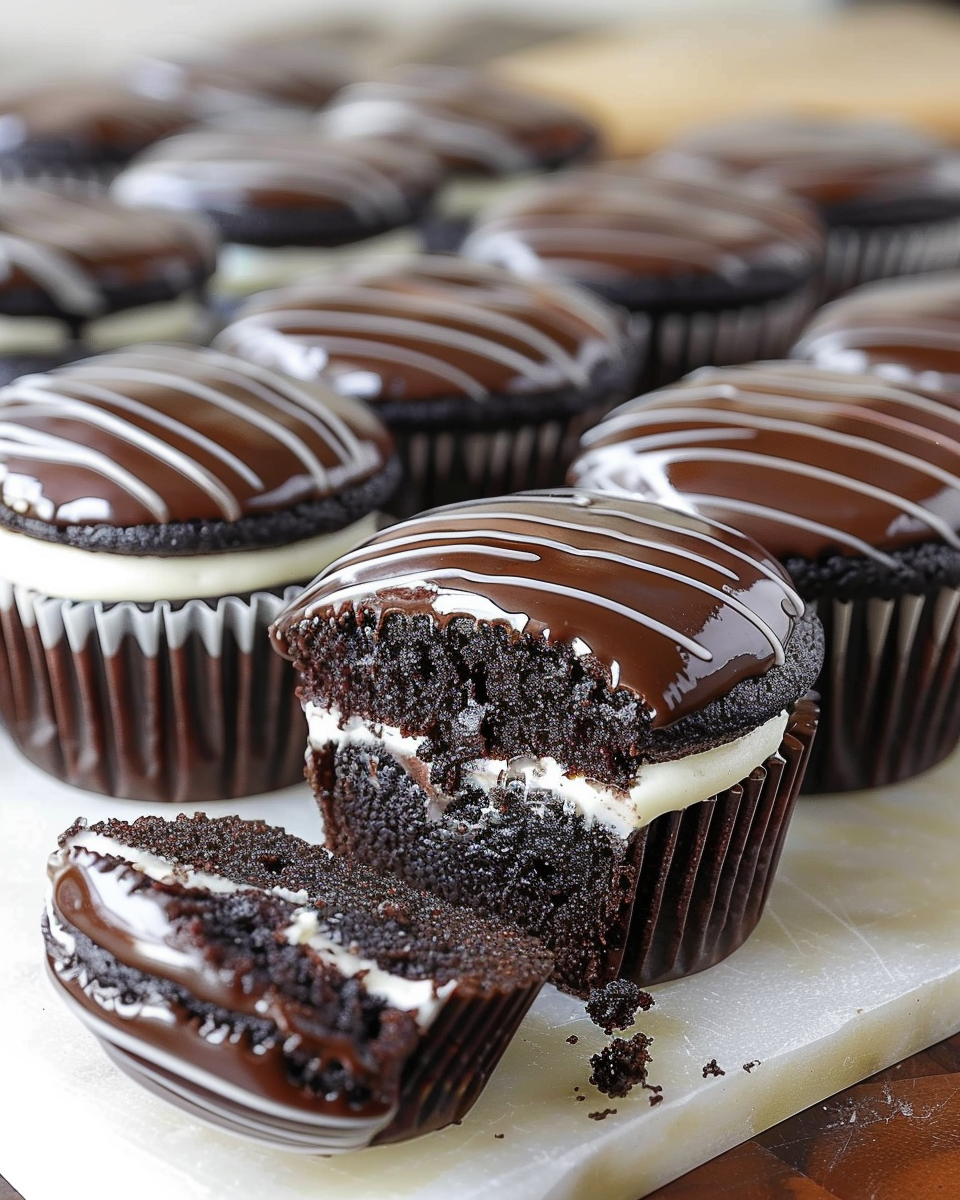
These Homemade Hostess Cupcakes elevate a mass-produced treat into something truly special and decadent. A super moist chocolate cupcake is filled with a light marshmallow filling and covered in chocolate ganache, then frosted with a swirl of vanilla icing!


Ingredients

– For the Chocolate Cupcakes:
1 cup all-purpose flour
1/2 cup unsweetened cocoa powder
1 cup granulated sugar
1 teaspoon baking powder
1/2 teaspoon baking soda
1/2 teaspoon salt
1/2 cup milk
1/4 cup vegetable oil
1 large egg
1 teaspoon vanilla extract
1/2 cup boiling water
– For the Cream Filling:
1/2 cup unsalted butter, softened
2 cups powdered sugar
1/2 teaspoon vanilla extract
2 tablespoons heavy cream
– For the Chocolate Ganache:
1 cup semi-sweet chocolate chips
1/2 cup heavy cream
2 tablespoons unsalted butter

Instructions

1. Preheat the oven to 350°F (175°C). Line a muffin tin with cupcake liners.
2. In a large mixing bowl, sift together the flour, cocoa powder, granulated sugar, baking powder, baking soda, and salt.
3. Add the milk, vegetable oil, egg, and vanilla extract to the dry ingredients and beat on medium speed for 2 minutes.
4. Stir in the boiling water until the batter is well combined. The batter will be thin.
5. Fill each cupcake liner about two-thirds full with batter.
6. Bake for 18-20 minutes, or until a toothpick inserted into the center of a cupcake comes out clean.
7. Remove from the oven and allow the cupcakes to cool in the pan for 5 minutes before transferring them to a wire rack to cool completely.
8. To make the cream filling, beat the softened butter in a medium mixing bowl until smooth.
9. Gradually add the powdered sugar and vanilla extract, beating until smooth and creamy.
10. Add the heavy cream and beat on medium-high speed for 2 minutes, until light and fluffy. Transfer the filling to a piping bag fitted with a round tip.
11. Once the cupcakes are completely cooled, insert the tip of the piping bag into the center of each cupcake and gently squeeze to fill with cream.
12. To make the chocolate ganache, place the chocolate chips in a heatproof bowl.
13. In a small saucepan, heat the heavy cream and butter over medium heat until it begins to simmer. Pour the hot cream mixture over the chocolate chips and let sit for 2-3 minutes.
14. Whisk the chocolate and cream until smooth and glossy.
15. Let the ganache cool slightly before spooning it over the filled cupcakes. Allow the ganache to set before serving.
  • Prep Time: 25 minutes
  • Cook Time: 20 minutes

Ingredients for Homemade Hostess Cupcakes

To make homemade Hostess cupcakes, you need a list of carefully selected ingredients for the cake, the cream filling, and the ganache topping. Here’s what you’ll need:

Chocolate Cupcakes:

  • 1 cup all-purpose flour
  • 1/2 cup unsweetened cocoa powder
  • 1 cup granulated sugar
  • 1 teaspoon baking powder
  • 1/2 teaspoon baking soda
  • 1/2 teaspoon salt
  • 1/2 cup milk
  • 1/4 cup vegetable oil
  • 1 large egg
  • 1 teaspoon vanilla extract
  • 1/2 cup boiling water

Cream Filling:

  • 1/2 cup unsalted butter, softened
  • 2 cups powdered sugar
  • 1/2 teaspoon vanilla extract
  • 2 tablespoons heavy cream

Chocolate Ganache:

  • 1 cup semi-sweet chocolate chips
  • 1/2 cup heavy cream
  • 2 tablespoons unsalted butter

These ingredients are what make the cupcakes moist, chocolaty, and just sweet enough without going overboard. The cream filling gives the cupcakes their signature soft center, and the ganache is the decadent topping that seals the deal.

Equipment and Tools

Before you start mixing and baking, make sure you have the right tools. Here’s a list of what you’ll need:

  • Muffin tin with cupcake liners
  • Large mixing bowl
  • Hand mixer or stand mixer
  • Whisk
  • Wire cooling rack
  • Piping bag with a round tip
  • Heatproof bowl for the ganache
  • Small saucepan

With these ingredients and tools at hand, you’re all set to create the perfect Hostess cupcakes from scratch. Now let’s get to the baking part in the next section!

Baking the Chocolate Cupcakes

Now that you have all the ingredients and tools ready, it’s time to start baking. The chocolate cupcakes are the foundation of our homemade Hostess cupcakes, so let’s make sure they’re perfectly moist and full of rich chocolate flavor.

Step-by-Step Instructions for the Cupcakes

  1. Preheat and Prepare: Preheat your oven to 350°F (175°C). Line a muffin tin with cupcake liners to prevent sticking and ensure easy removal after baking.
  2. Mix the Dry Ingredients: In a large mixing bowl, sift together the all-purpose flour, unsweetened cocoa powder, granulated sugar, baking powder, baking soda, and salt. This step helps prevent clumps and ensures a smooth batter.
  3. Combine the Wet Ingredients: Add the milk, vegetable oil, egg, and vanilla extract to the dry ingredients. Beat with a hand mixer or stand mixer on medium speed for about two minutes. This ensures everything is well-mixed and creates a consistent batter.
  4. Add the Boiling Water: Slowly pour the boiling water into the batter, stirring as you go. The batter will be quite thin—this is normal, so don’t worry! The boiling water helps to activate the baking powder and soda, giving your cupcakes a light and airy texture.
  5. Fill the Cupcake Liners: Carefully fill each cupcake liner about two-thirds full with the batter. This allows enough room for the cupcakes to rise without overflowing.
  6. Bake the Cupcakes: Place the muffin tin in the oven and bake for 18-20 minutes. Keep an eye on them, and use a toothpick to test for doneness. If it comes out clean or with a few crumbs, they’re ready.
  7. Cool the Cupcakes: Once baked, remove the cupcakes from the oven and let them cool in the pan for about five minutes. After that, transfer them to a wire cooling rack to cool completely before you start filling them with cream and adding the ganache.

With these steps, your cupcakes will be ready for the next phase: filling and decorating. Get ready to make these sweet treats even sweeter in the following section.

Making the Cream Filling

The cream filling is the heart of these Homemade Hostess Cupcakes. It’s what makes each bite a burst of sweetness. This step-by-step guide will help you whip up a smooth and fluffy cream filling that’s just like the classic version, but better because you made it yourself!

Step-by-Step Instructions for the Cream Filling

  1. Soften the Butter: In a medium mixing bowl, beat the unsalted butter with a hand mixer or stand mixer until it’s soft and smooth. This creates the perfect base for the cream filling.
  2. Add Powdered Sugar and Vanilla Extract: Gradually add the powdered sugar, a little at a time, to avoid a sugar cloud. Mix in the vanilla extract as well, and continue beating until the mixture is smooth and creamy.
  3. Add Heavy Cream: Pour in the heavy cream and beat on medium-high speed for about two minutes. This will lighten the filling, giving it a fluffy texture that melts in your mouth.
  4. Transfer to a Piping Bag: Once the filling is light and fluffy, transfer it to a piping bag with a round tip. If you don’t have a piping bag, you can use a ziplock bag and cut off a small corner for a makeshift piping tip.

With your cream filling ready to go, it’s time to bring those cupcakes to life! In the next part, we’ll fill the cupcakes with this delicious cream and then move on to the final step: the chocolate ganache topping. Get ready for the grand finale!

Preparing the Chocolate Ganache

Now that you’ve got your cupcakes baked and cream filling ready, it’s time for the chocolate ganache. This smooth, glossy topping is what gives Homemade Hostess Cupcakes their signature look. It’s rich, decadent, and easy to make. Let’s dive into the steps for creating the perfect ganache.

Step-by-Step Instructions for the Chocolate Ganache

  1. Heat the Cream and Butter: In a small saucepan, heat the heavy cream and unsalted butter over medium heat until they just start to simmer. You don’t want the mixture to boil, just a gentle simmer.
  2. Melt the Chocolate Chips: Place the semi-sweet chocolate chips in a heatproof bowl. Once the cream and butter are hot, pour them over the chocolate chips. Let them sit for 2-3 minutes to melt the chocolate.
  3. Stir Until Smooth: After a few minutes, use a whisk or a spatula to stir the chocolate and cream together. The mixture should be smooth and glossy. If there are still chunks of chocolate, you can heat the mixture over a double boiler or microwave it in short bursts, stirring frequently.
  4. Let the Ganache Cool: Before using the ganache to top your cupcakes, let it cool for a bit. You want it to thicken slightly, but still be pourable. If it’s too thin, it will run off the cupcakes, and if it’s too thick, it won’t spread evenly.

Once your ganache is at the right consistency, you’re ready to finish assembling your cupcakes. In the next part, we’ll fill the cupcakes with cream and top them with this luscious ganache. It’s the moment we’ve all been waiting for!

Filling and Decorating the Cupcakes

With the cream filling and chocolate ganache ready, it’s time to bring it all together. This is where your Homemade Hostess Cupcakes get their final touch. Follow these steps to fill and decorate your cupcakes, creating that iconic look and taste.

Step-by-Step Instructions for Assembling the Cupcakes

  1. Create a Hole for the Cream Filling: Once your cupcakes are completely cool, use a paring knife or a cupcake corer to remove a small circle from the center of each cupcake. Aim for a hole that’s about an inch deep, leaving enough cake around the edges to hold the structure.
  2. Fill with Cream: Take your piping bag filled with cream filling and insert the tip into the hole you’ve created. Gently squeeze until the cupcake is filled, but not overflowing. You can reserve the cut-out pieces to use as plugs, giving your cupcakes a cleaner look.
  3. Top with Ganache: Once the cupcakes are filled, spoon the chocolate ganache over the top. Start from the center and work your way outwards, allowing it to drip over the edges slightly. The ganache should be smooth and glossy, creating that classic Hostess cupcake look.
  4. Optional: Add Decorations: If you want to get creative, you can add sprinkles or other edible decorations to the ganache before it sets. This adds a fun touch and makes your cupcakes even more appealing.
  5. Let the Ganache Set: After decorating, let the cupcakes sit for a few minutes to allow the ganache to firm up. This way, it’ll be easier to transport and serve without making a mess.

With your cupcakes assembled and decorated, they’re ready to be enjoyed! These homemade Hostess cupcakes are sure to impress, and the best part is, you made them yourself. Now, let’s wrap up this baking journey with some additional tips and FAQs in the next section.

Additional Tips and Variations

Making Homemade Hostess Cupcakes is a rewarding experience, and there are ways to add your own flair. Here are some tips and variations to make these cupcakes uniquely yours.

Tips for Perfect Cupcakes

  • Room Temperature Ingredients: Ensure all your ingredients are at room temperature before you start baking. This helps the batter mix evenly, resulting in a more consistent texture.
  • Don’t Overmix: When combining the wet and dry ingredients, mix until just combined. Overmixing can lead to dense, tough cupcakes.
  • Testing for Doneness: Insert a toothpick into the center of a cupcake; if it comes out clean or with a few crumbs, they’re done. If there’s batter on the toothpick, give them a few more minutes.

Variations to Try

  • Flavored Cream Filling: Add a touch of your favorite extract, like almond or peppermint, to the cream filling for a unique twist.
  • Different Ganache: Experiment with dark or white chocolate for the ganache. Dark chocolate adds richness, while white chocolate creates a sweeter, creamier topping.
  • Decorative Toppings: Beyond sprinkles, consider adding edible glitter, crushed cookies, or candy pieces to the ganache for extra visual appeal.

These tips and variations can elevate your homemade cupcakes to the next level. Feel free to experiment and find what works best for you. Now that you’ve got the basics down, let’s address some common questions about making and storing these cupcakes in the next section.

FAQs About Homemade Hostess Cupcakes

Creating Homemade Hostess Cupcakes is a fun and rewarding process, but you might have some questions about storage, customization, and substitutions. Here are answers to some of the most frequently asked questions about these delightful treats.

How Long Do Homemade Hostess Cupcakes Last?

Homemade Hostess cupcakes can last up to 3 days at room temperature if stored in an airtight container. If you want them to stay fresh longer, consider refrigerating them, which can extend their shelf life to about a week. Just be sure to bring them back to room temperature before serving for the best flavor and texture.

Can I Freeze Homemade Hostess Cupcakes?

Yes, you can freeze these cupcakes! Once they’ve cooled and been filled, wrap each cupcake individually in plastic wrap and place them in a freezer-safe container or bag. They can be stored in the freezer for up to 2 months. To thaw, simply remove them from the freezer and let them sit at room temperature for a few hours. Add the ganache topping after thawing for best results.

What’s the Best Chocolate for Ganache?

For a classic ganache, semi-sweet chocolate chips are a great choice. If you prefer a richer flavor, try using dark chocolate. White chocolate is also an option if you want a lighter, sweeter ganache. The key is to use high-quality chocolate for the best results.

Can I Use Gluten-Free Flour?

Absolutely! To make gluten-free Hostess cupcakes, you can substitute the all-purpose flour with a gluten-free baking mix. Be sure to check that the mix contains xanthan gum or another binding agent to ensure the cupcakes hold together.

What’s the Best Way to Store Filled Cupcakes?

After filling the cupcakes with cream and topping them with ganache, store them in an airtight container to keep them fresh. If you plan to eat them within a few days, keeping them at room temperature is fine. For longer storage, refrigerate or freeze them, as mentioned earlier.

These FAQs should cover the most common questions about making and storing Homemade Hostess Cupcakes. Now, let’s wrap up with a conclusion and a call to action in the next section.

Conclusion

You’ve made it through the entire process of creating Homemade Hostess Cupcakes, from gathering ingredients and baking the chocolate cupcakes to filling them with cream and topping them with a decadent ganache. The result? A batch of delicious, freshly made cupcakes that are sure to bring smiles and sweet memories.

Homemade cupcakes have a special charm. You can customize them to suit your taste and share them with family and friends, knowing that every bite is made with love. It’s a great way to spend time in the kitchen, and the results are always worth it.

If you haven’t tried making these cupcakes yet, now’s the time to give it a shot. You’ll be amazed at how simple the process is and how satisfying it feels to create something so delightful. Plus, you can tweak the recipe to your liking, adding your own unique touch.

Leave a Comment

Recipe rating